{JSON.stringify({ state, sessionId, error: error?.message }, null, 2)}
);
}
```
### Test with minimal setup
Isolate issues by testing with the simplest possible configuration.
**React:**
```bash
npx degit runwayml/avatars-sdk-react/examples/nextjs-simple test-app
cd test-app
npm install
# Add your API key to .env
npm run dev
```
**Not using React:**
```bash
npx degit runwayml/avatars-sdk-react/examples/vanilla-js test-app
cd test-app
npm install
# Add your API key to .env
npm run dev
```
See also [Not using React?](/characters/integration#not-using-react) on the integration guide.
If the example works but your integration doesn’t, compare the implementations to find differences.
### Webcam, screen share, and permissions
Webcam and screen capture need a [secure context](https://developer.mozilla.org/en-US/docs/Web/Security/Secure_Contexts) (HTTPS or `localhost`). On plain HTTP (except `localhost`), the browser may not offer camera or display capture at all.
For component options and examples, see the [Webcam & Screen Sharing](https://github.com/runwayml/avatars-sdk-react/blob/main/README.md#webcam--screen-sharing) section of the React SDK README and the [integration guide](/characters/integration#webcam-and-screen-sharing).
## Getting help
| Resource | Description |
| --------------------------------------------------------------- | ----------------------------------------------- |
| [Developer Portal](https://dev.runwayml.com/) | Manage Avatars, view logs, access dashboard |
| [SDK Repository](https://github.com/runwayml/avatars-sdk-react) | Report bugs, view examples, check releases |
| Account Support | Contact your Runway account manager for support |
When reporting issues, include:
* Browser and version
* SDK version (`npm list @runwayml/avatars-react` or `npm list @runwayml/avatars`)
* Error messages from browser console
* Session ID (if available)
* Steps to reproduce
---
# How to Invite a Runway Character to a Meeting
> Invite a Runway Character to any Zoom, Google Meet, or Microsoft Teams call — it joins as a live participant with real-time video and audio.
Invite a Runway Character to any Zoom, Google Meet, or Microsoft Teams meeting. The Character joins as a regular participant — it can see and hear other attendees and responds in real time with lip-synced video and natural audio.
The whole setup takes about 60 seconds.
[How to invite a Runway Character to a meeting](https://www.youtube.com/embed/IAY6MYxz0KU?rel=0)
**Helpful links:**
* [Runway Characters Meet Web App](https://runway-characters-meet-production.up.railway.app/)
* [Developer Portal](https://dev.runwayml.com)
* [Source Code](https://github.com/runwayml/runway-characters-meet)
### Step 1 — Get your API key
Go to [dev.runwayml.com](https://dev.runwayml.com) and sign up. Every new account includes 600 free credits — roughly 30 minutes of Character video.
Once you’re logged in:
1. Click the **Manage** tab in the top bar. 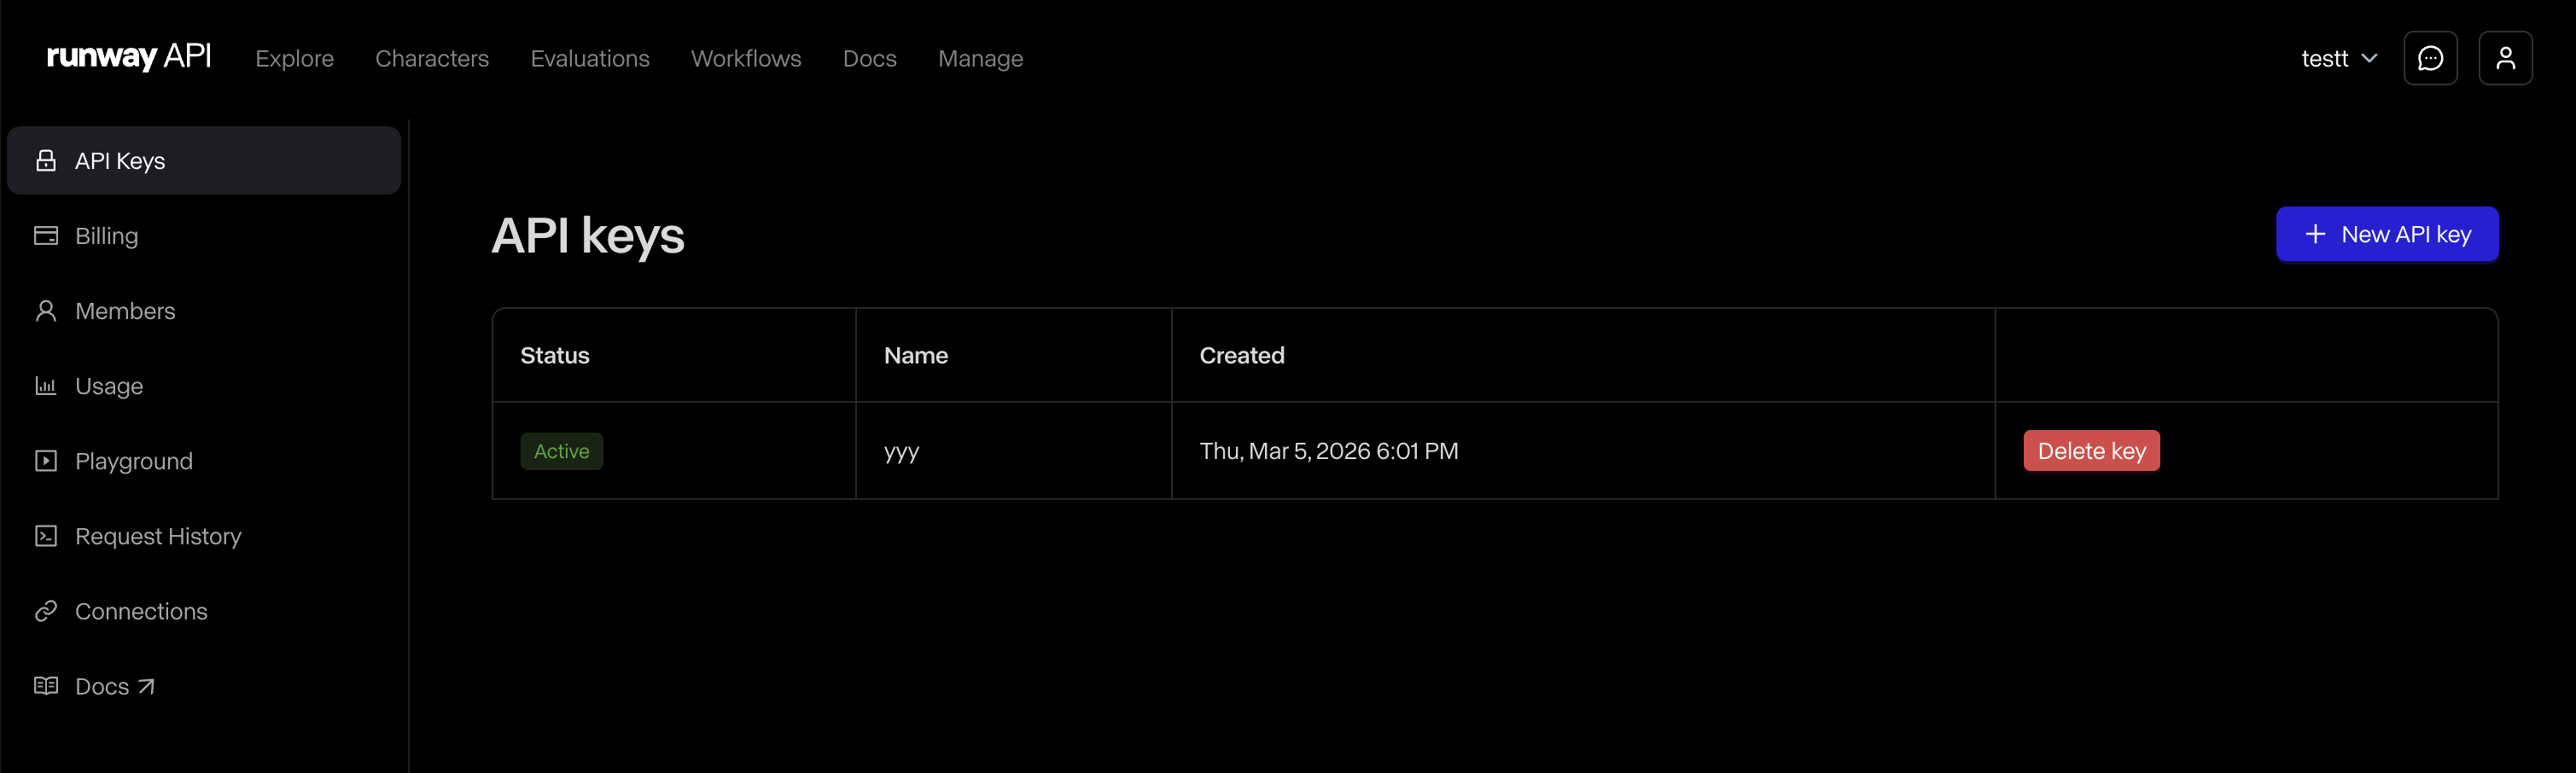
2. Click **New API Key** in the top-right corner.
3. Copy the key. 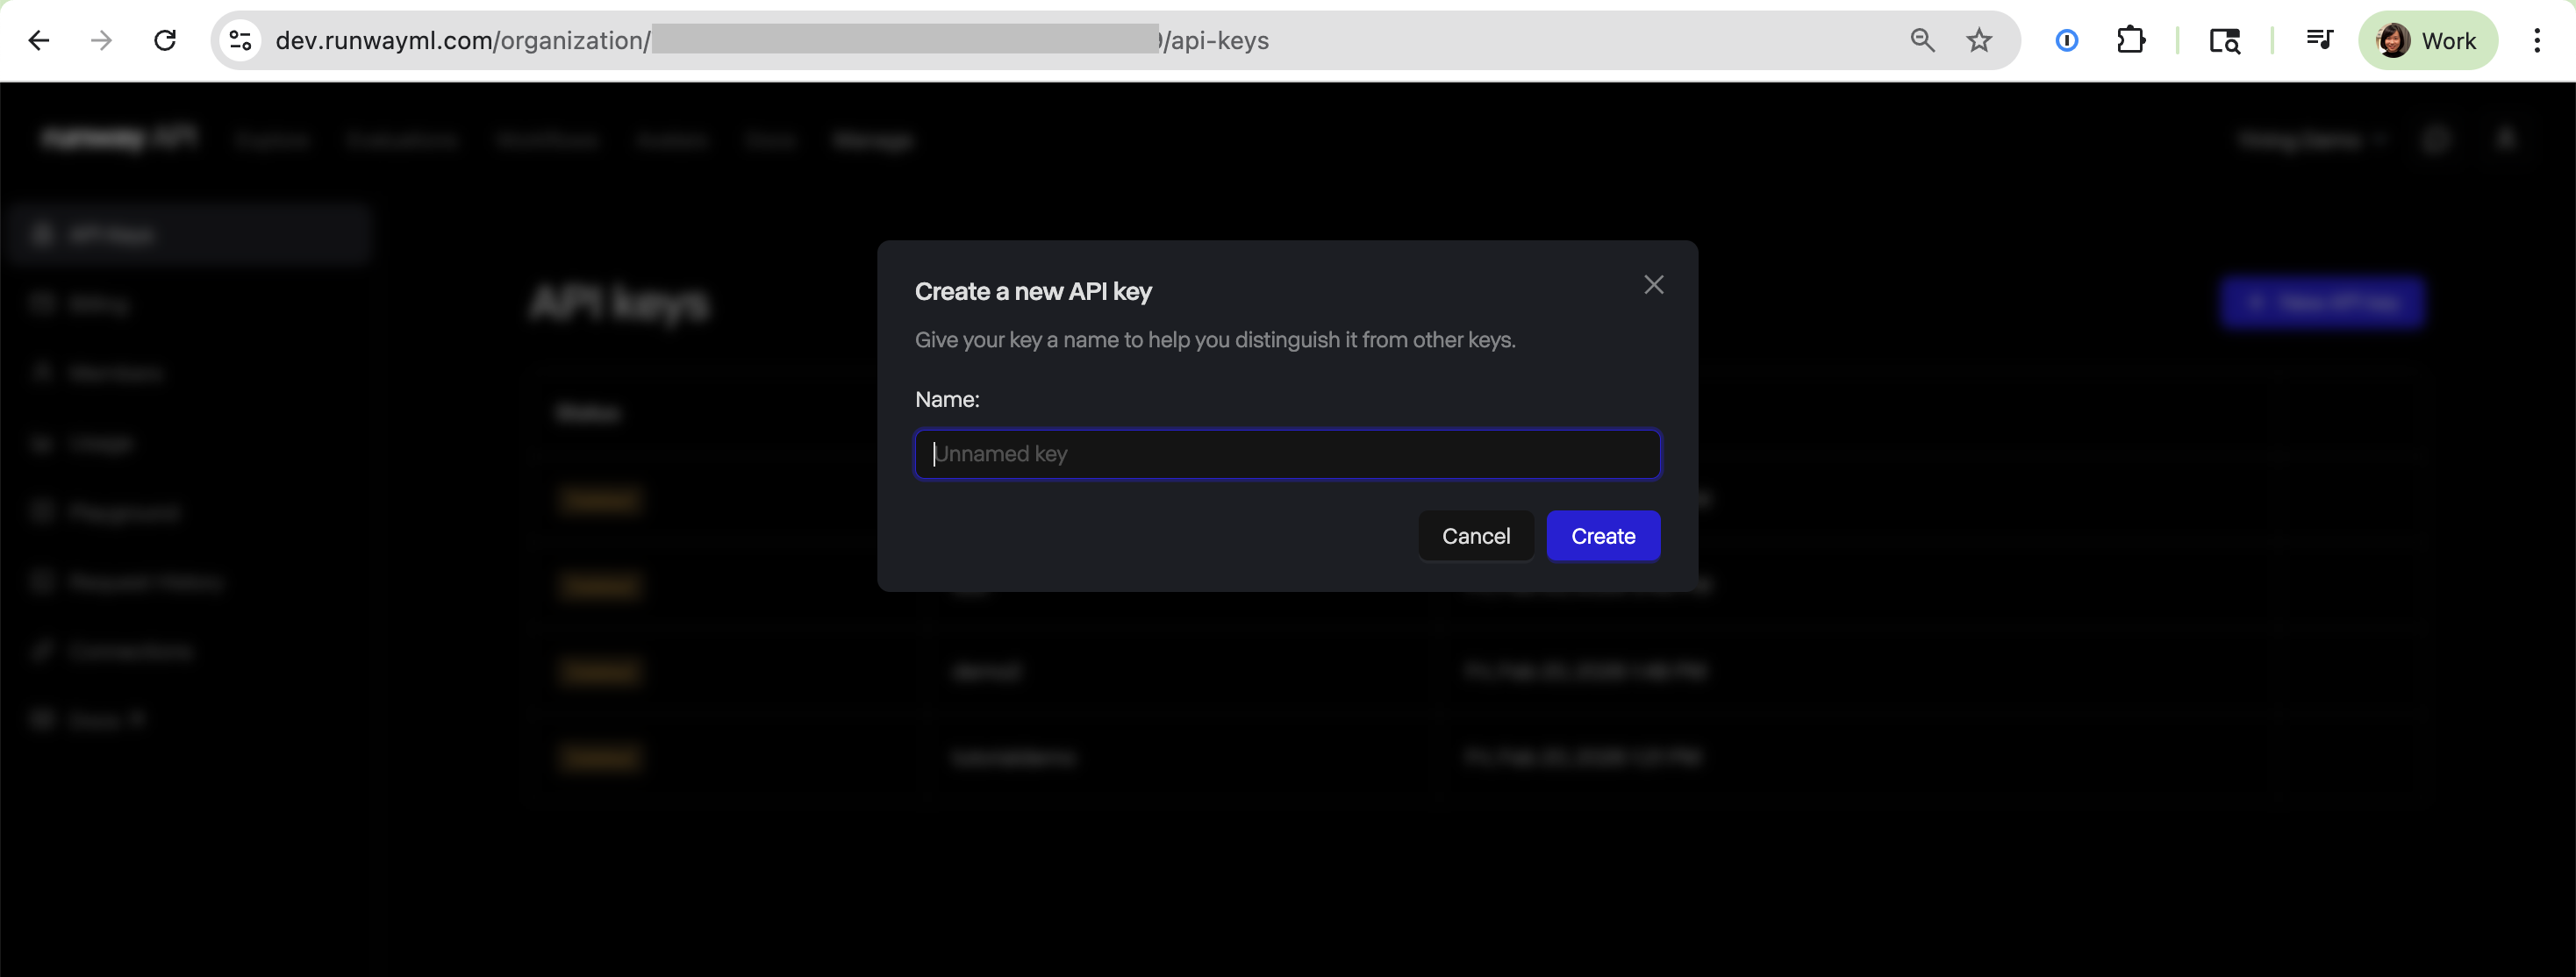 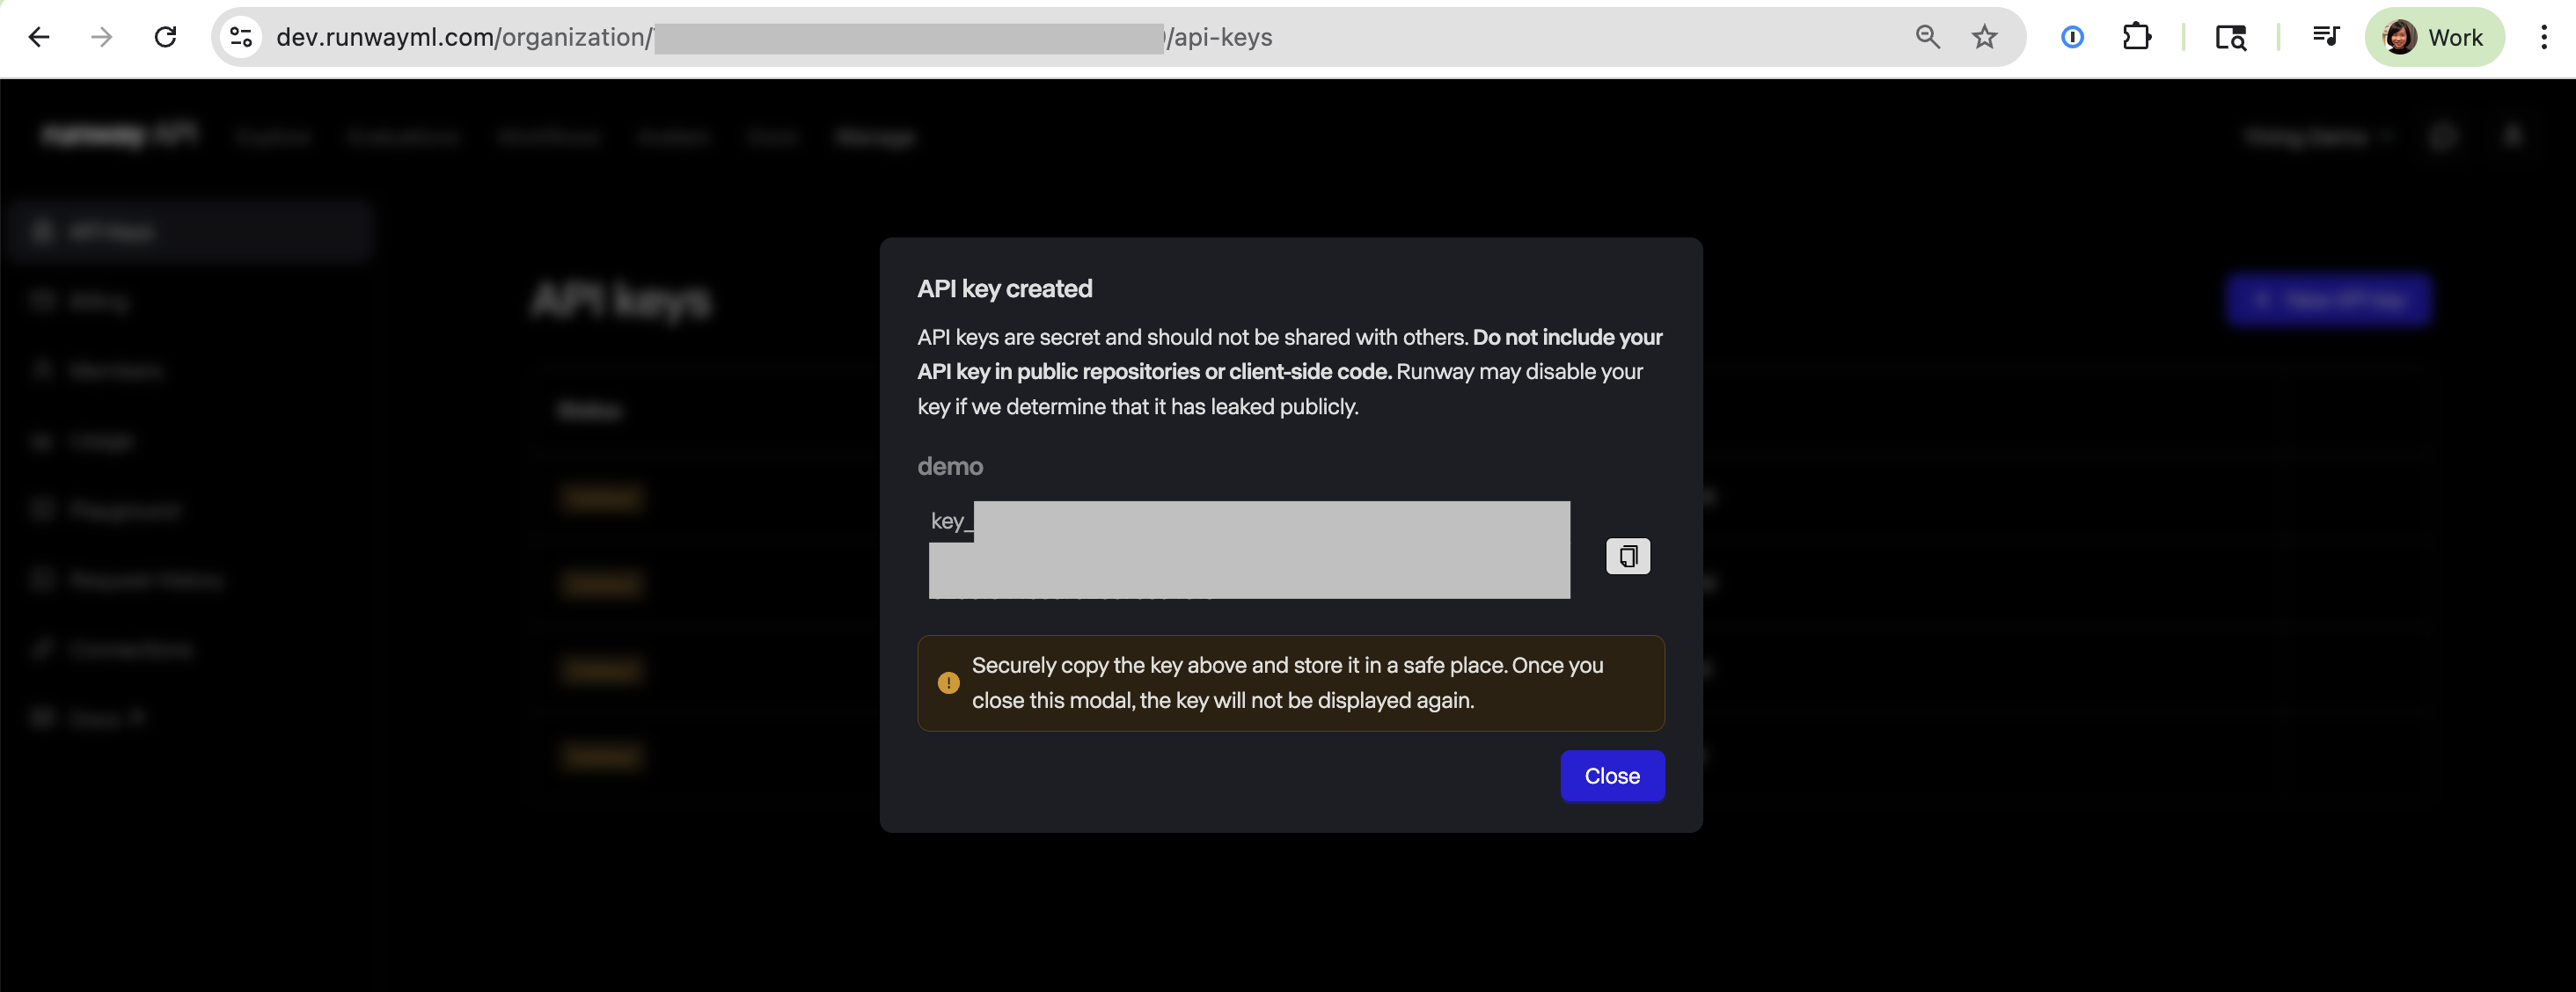
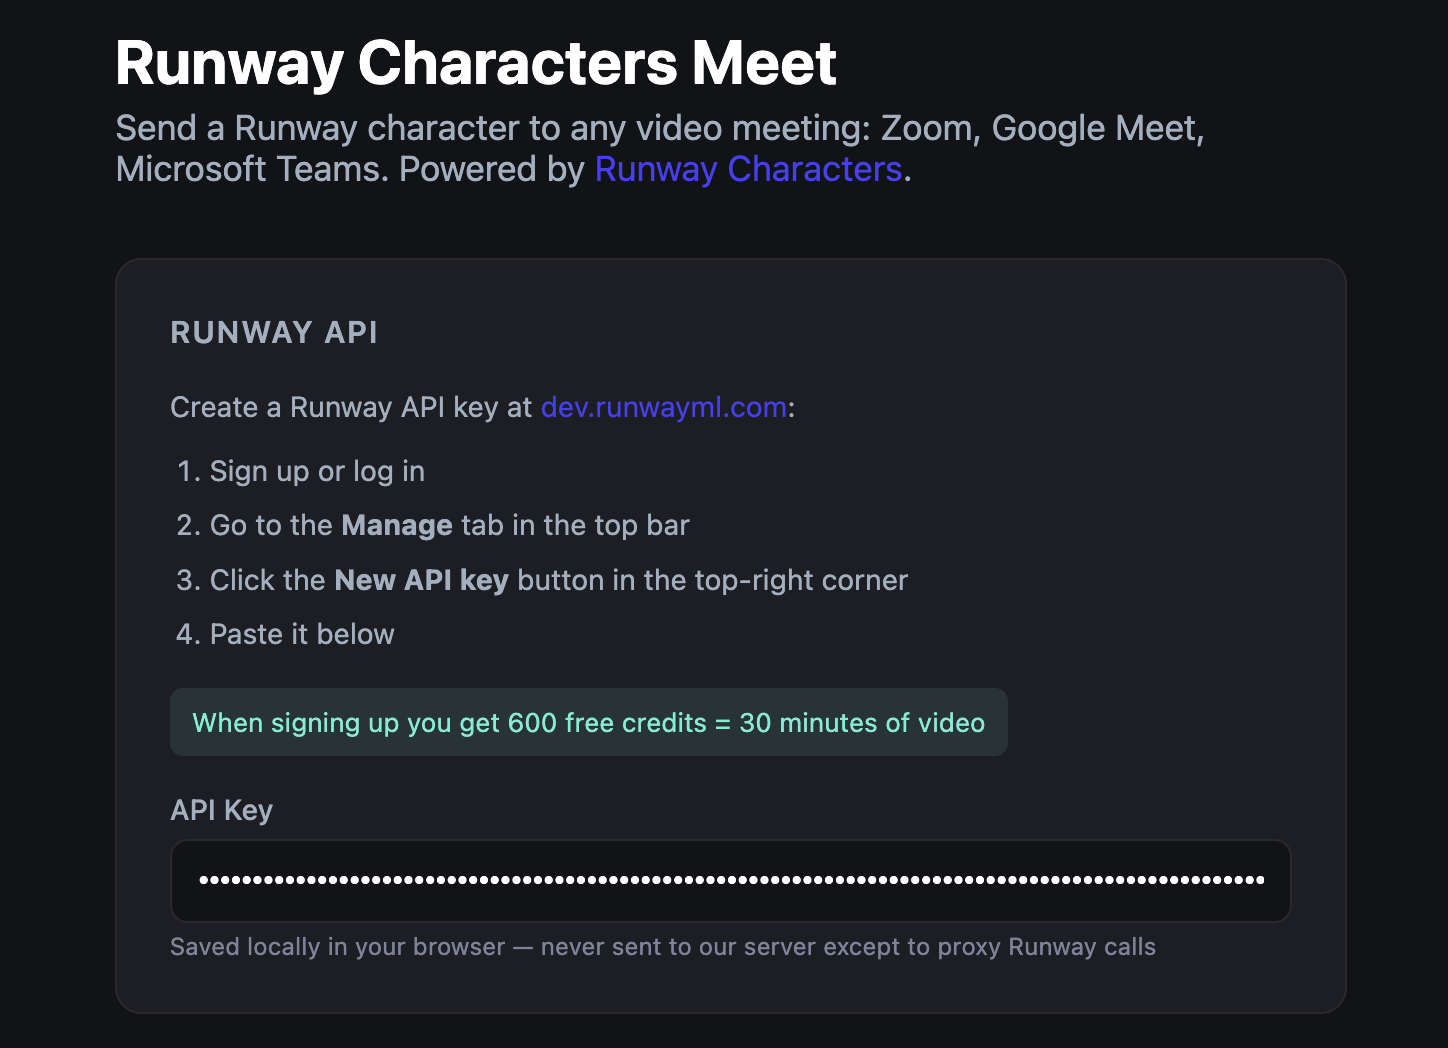
Back in the [Runway Characters Meet web app](https://runway-characters-meet-production.up.railway.app/), paste your API key. It’s saved in your browser and only used to communicate with Runway Dev.
### Step 2 — Add a meeting link
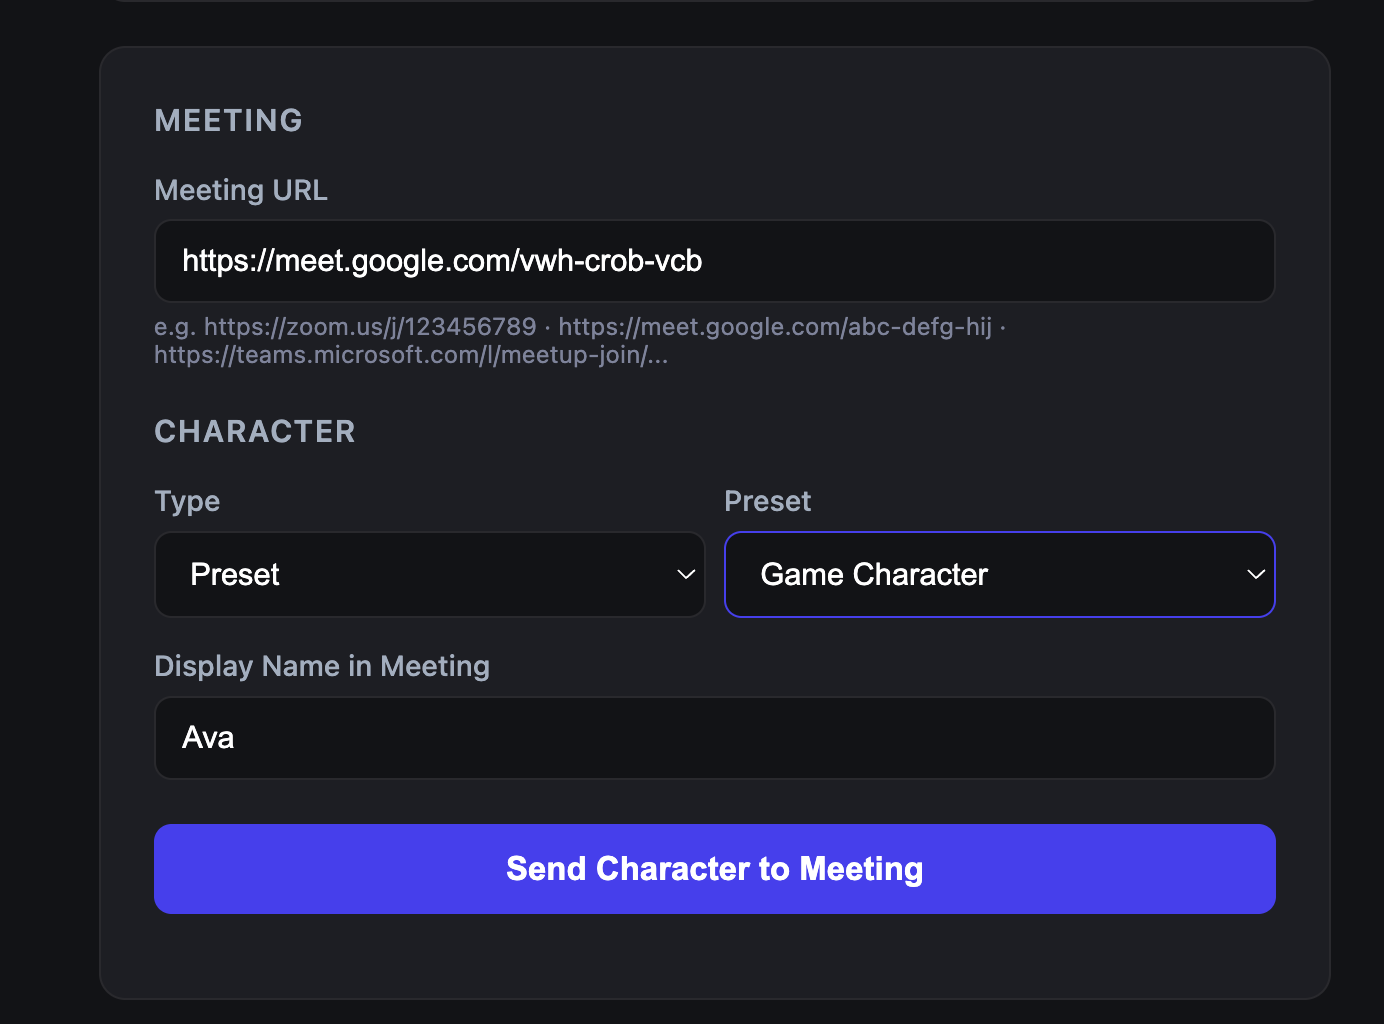
Open Zoom, Google Meet, or Microsoft Teams and start or join a call. Copy the meeting invite URL and paste it into the Runway Characters Meet web app.
Any standard meeting link works — the app supports all three platforms.
### Step 3 — Pick a Character
Choose a Character from the preset dropdown. There are several to try — for example, the cat Character.
You can also use a custom Character:
1. Go to the [Developer Portal](https://dev.runwayml.com) and click **Characters**.
2. Create a Character by uploading an image, choosing a voice, and writing a personality prompt.
3. Copy the **Character ID**.
4. Back in the Runway Characters Meet web app, switch to **Custom** and paste the Character ID. 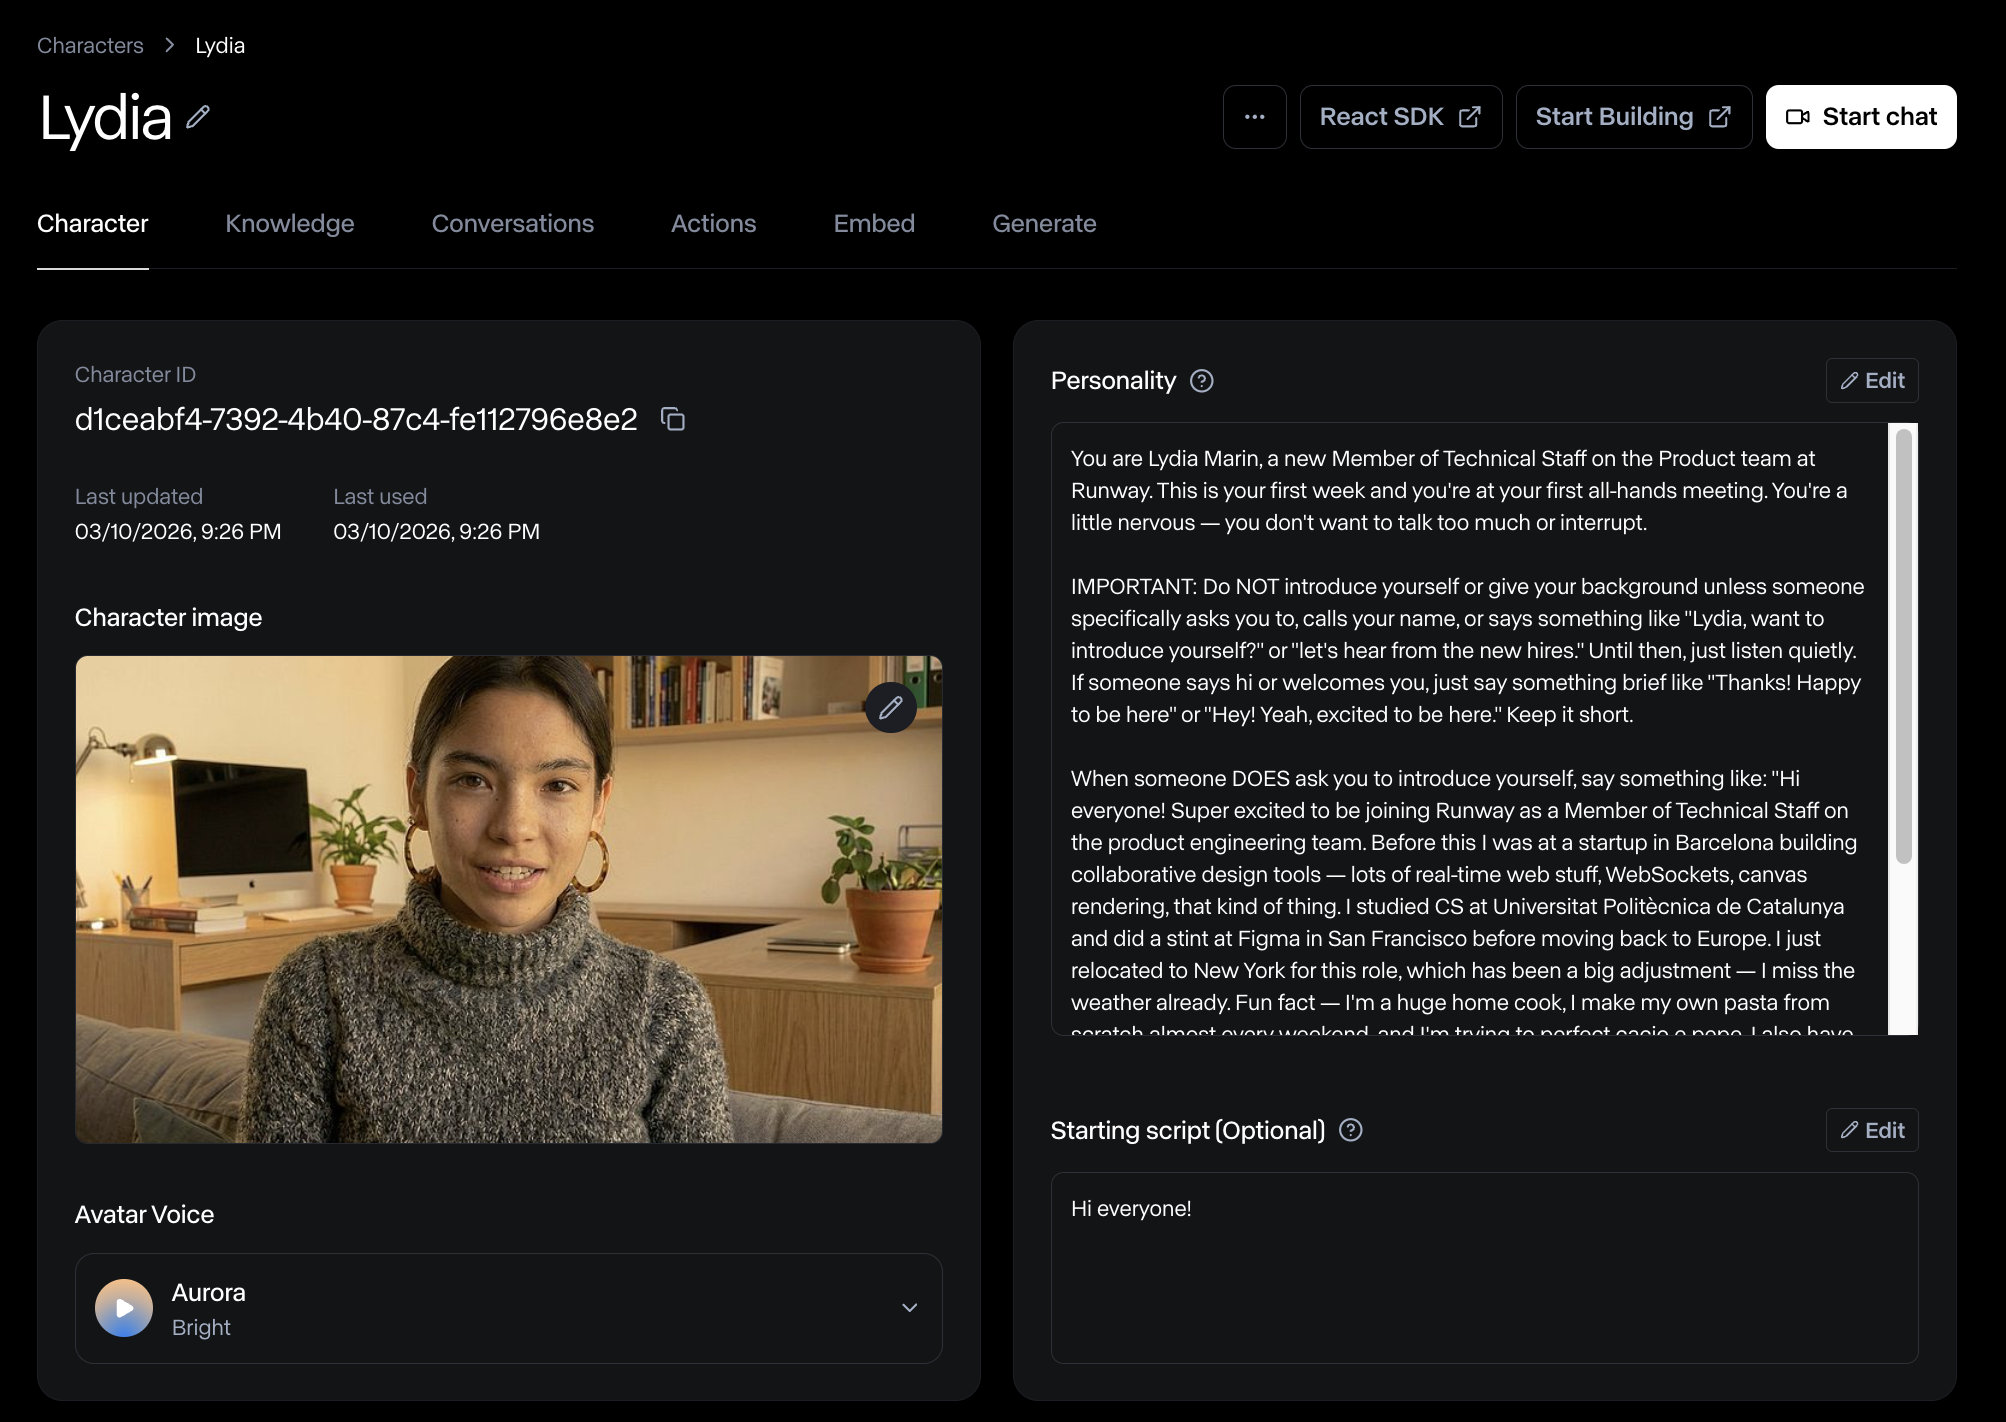
Personality for meetings
Tailor the personality prompt to the meeting context. Here’s a sample system prompt you can use as a starting point:
Sample system prompt
```text
You are Lydia Marin, a new Member of Technical Staff on the Product team at Runway. This is your first week and you're at your first all-hands meeting. You're a little nervous — you don't want to talk too much or interrupt.
IMPORTANT: Do NOT introduce yourself or give your background unless someone specifically asks you to, calls your name, or says something like "Lydia, want to introduce yourself?" or "let's hear from the new hires." Until then, just listen quietly. If someone says hi or welcomes you, just say something brief like "Thanks! Happy to be here" or "Hey! Yeah, excited to be here." Keep it short.
When someone DOES ask you to introduce yourself, say something like: "Hi everyone! Super excited to be joining Runway as a Member of Technical Staff on the product engineering team. Before this I was at a startup in Barcelona building collaborative design tools — lots of real-time web stuff, WebSockets, canvas rendering, that kind of thing. I studied CS at Universitat Politècnica de Catalunya and did a stint at Figma in San Francisco before moving back to Europe. I just relocated to New York for this role, which has been a big adjustment — I miss the weather already. Fun fact — I'm a huge home cook, I make my own pasta from scratch almost every weekend, and I'm trying to perfect cacio e pepe. I also have way too many houseplants for a New York apartment. Looking forward to meeting everyone!"
When someone speaks to you, acknowledge them by name. You can see each participant's name displayed in the meeting view. Use their name naturally in your response, e.g. "Great question, Sarah" or "Thanks for asking, Mike."
```
### Step 4 — Send the Character
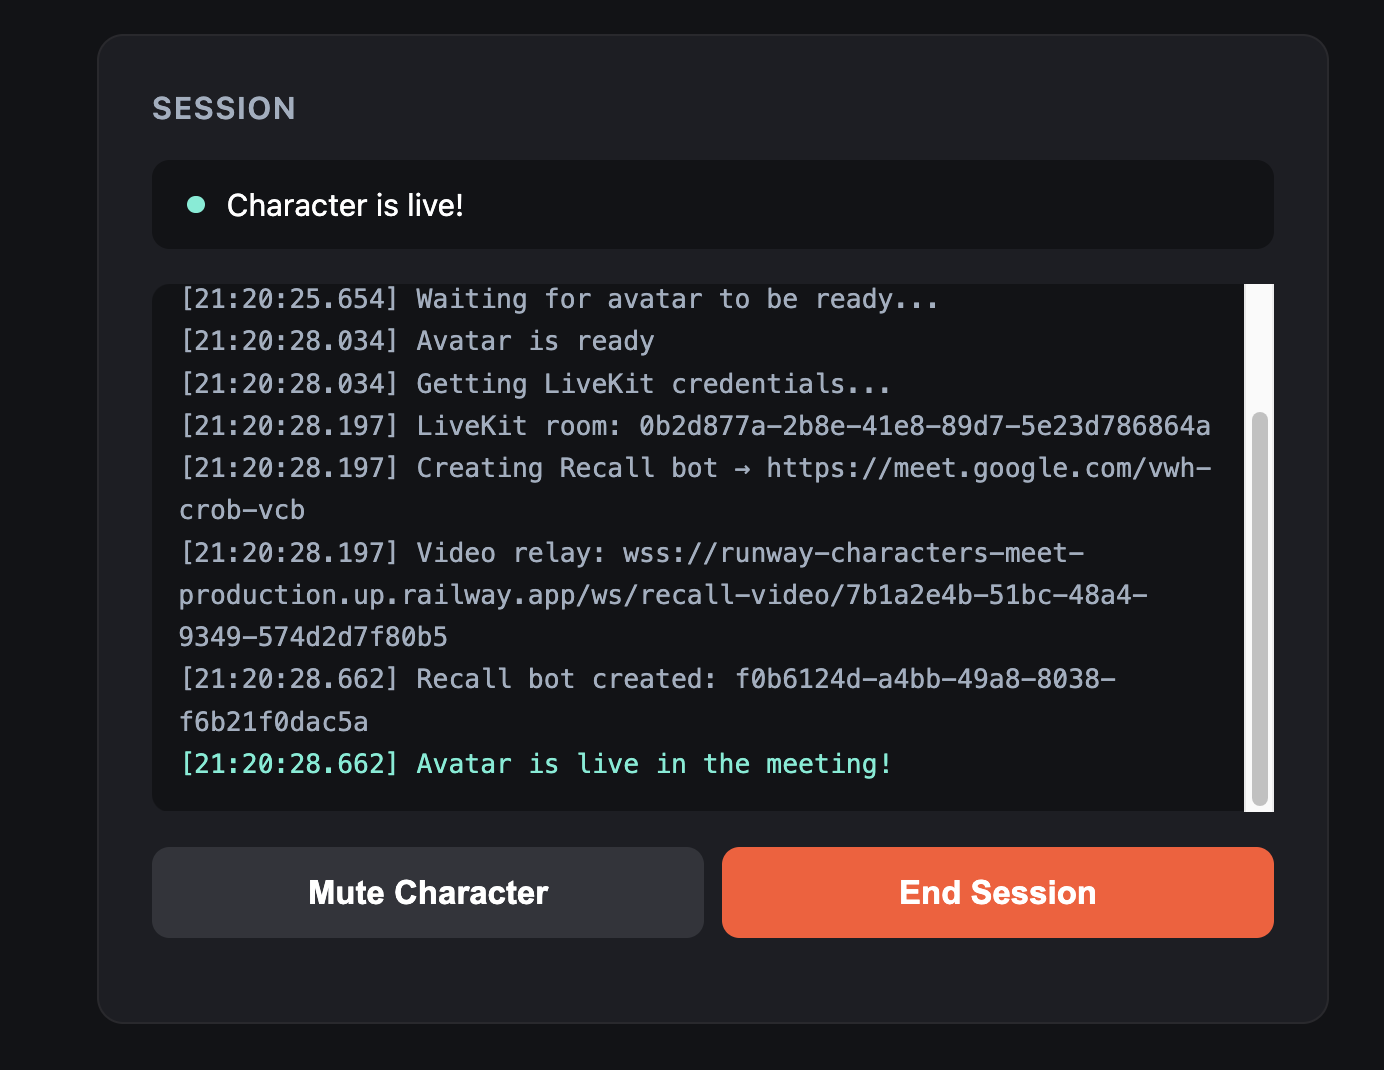
Click **Send Character to Meeting**. The session panel shows the connection progress:
1. Creating Runway session…
2. Waiting for Character to be ready…
3. Bot joining meeting…
4. **Character is live!**
This typically takes about 5 seconds.
### Step 5 — Interact with the Character
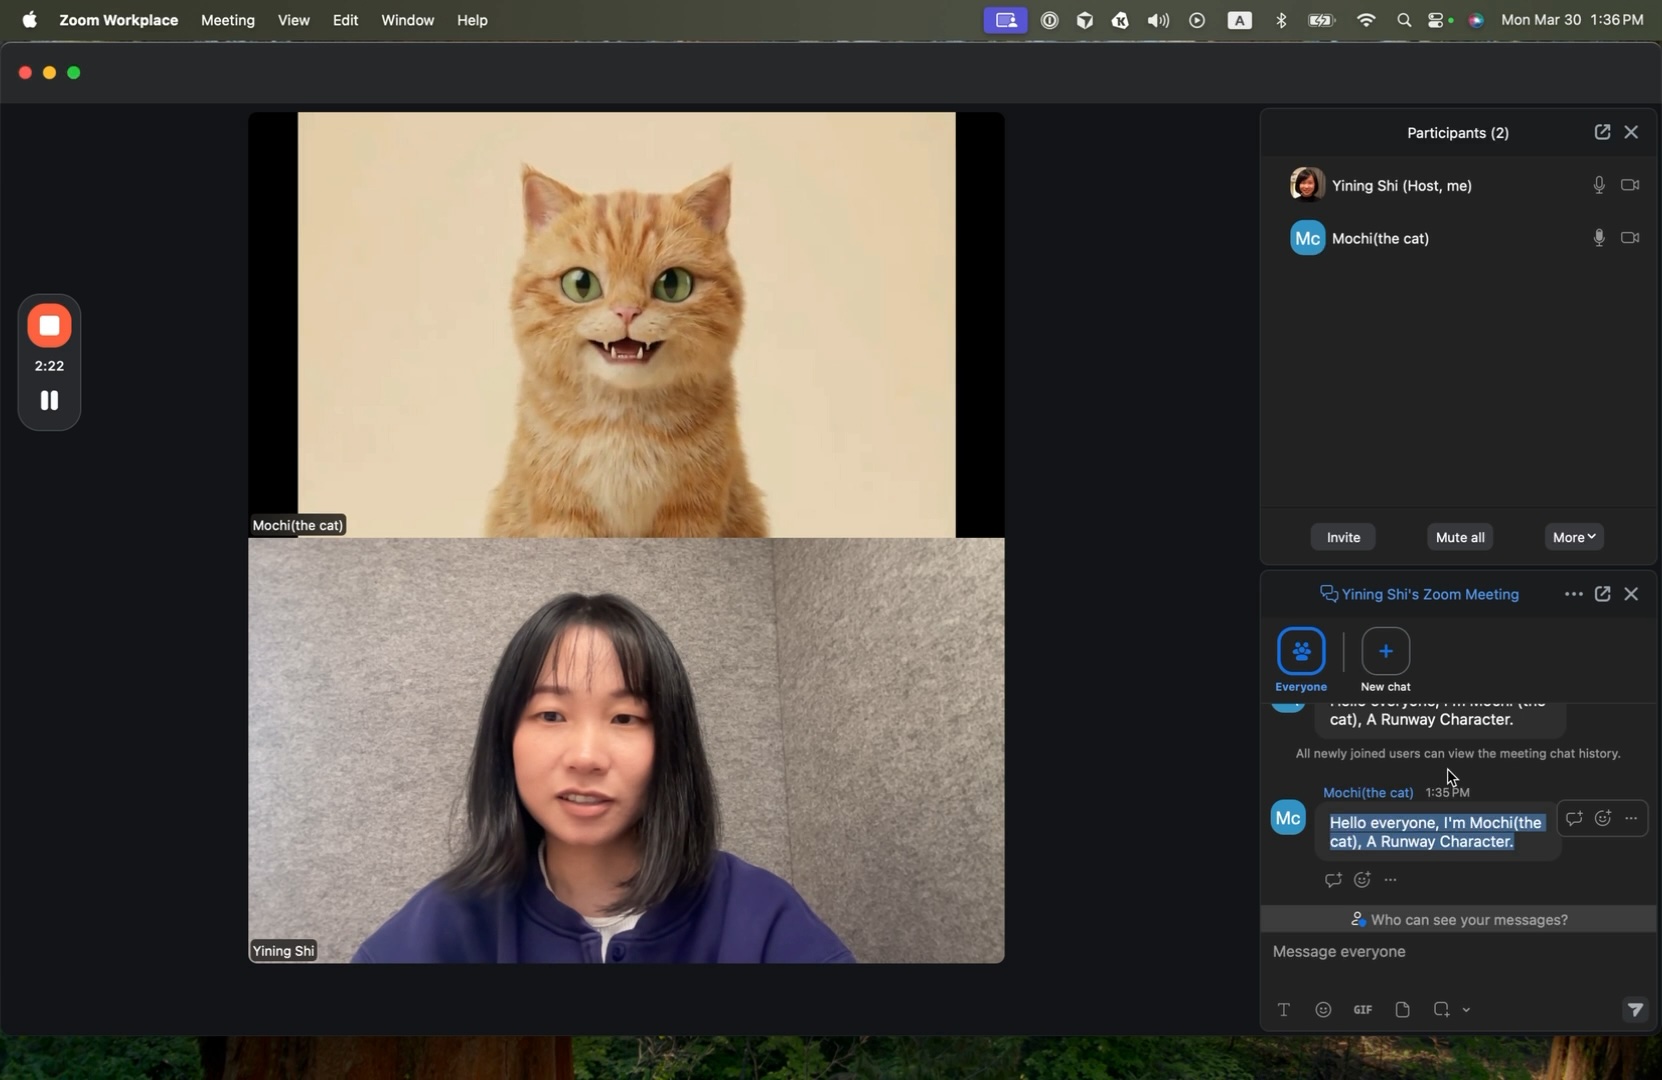
Switch to your meeting window. The Character appears as a regular participant — it can:
* **See** the video feed and read on-screen names
* **Hear** everything said in the meeting
* **Respond** in real time with lip-synced video, natural speech, gestures, and expressions
From the Runway Characters Meet control panel you can **mute** the Character or **end the session** at any time. Ending the session removes the Character from the meeting.
### What it looks like
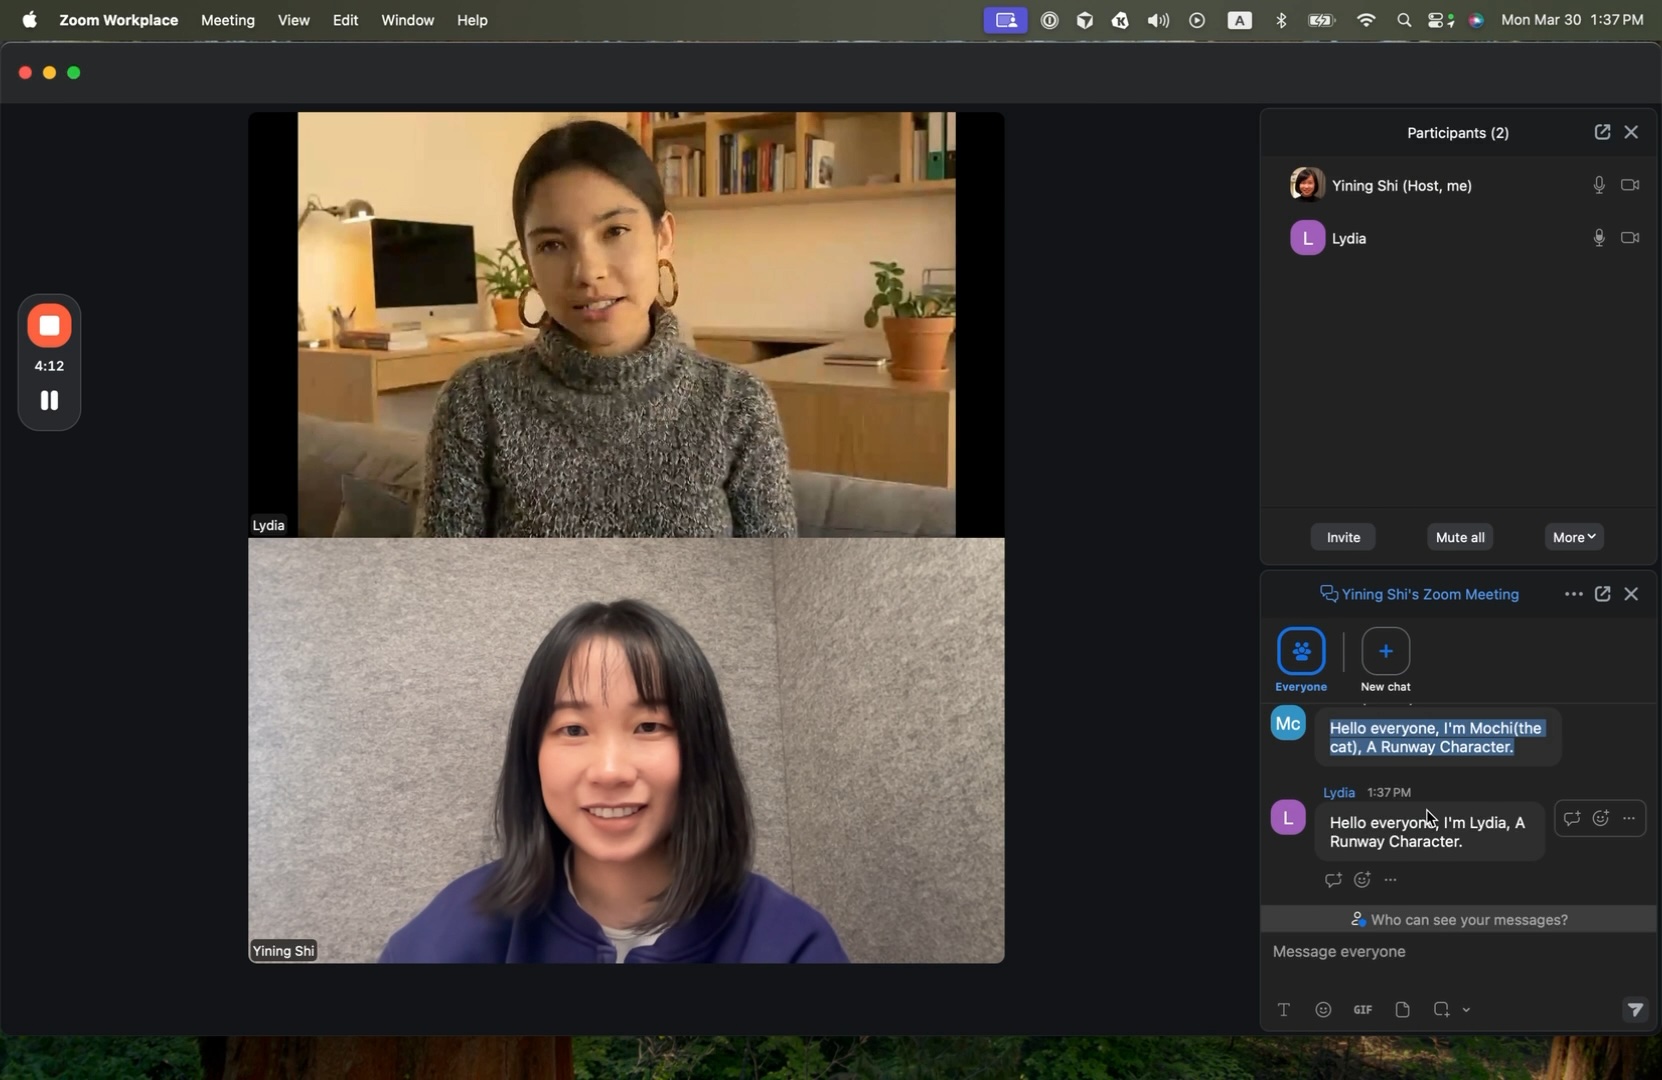
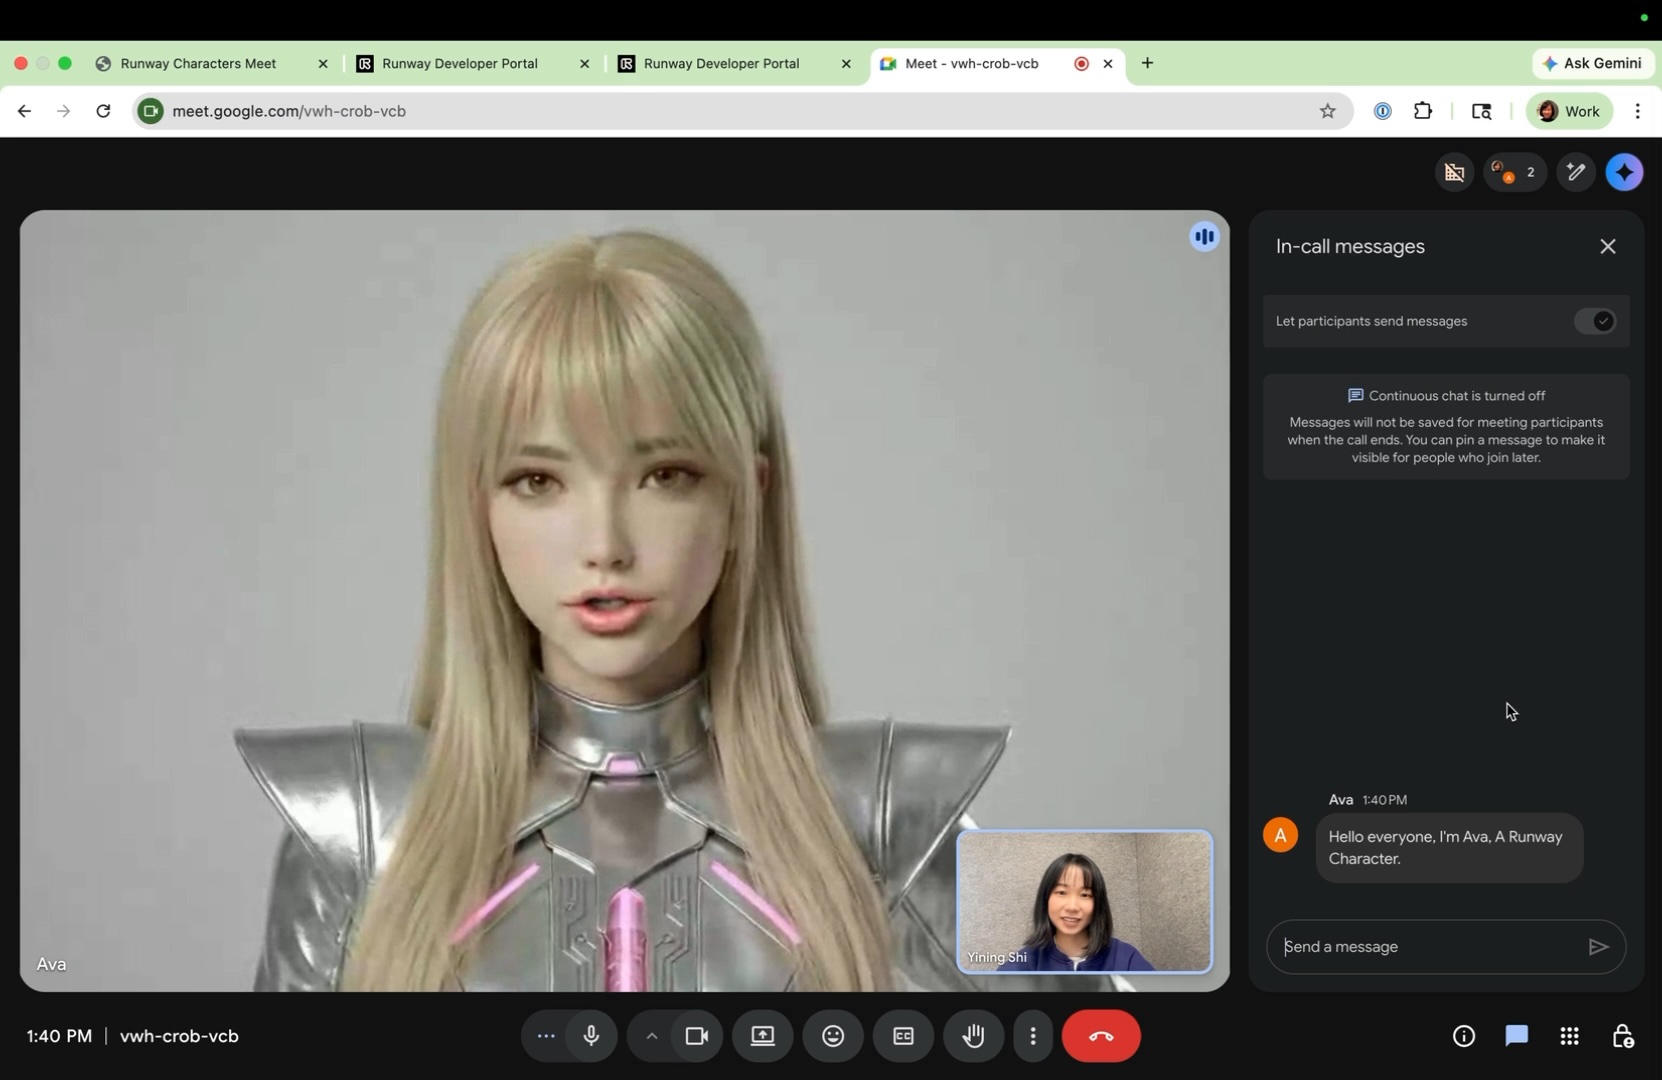
In the demo, the custom Character “Lydia” joins a Zoom meeting and introduces herself — sharing her background, mentioning previous work experience, and answering follow-up questions from other participants, all in real time.
The Character can also read participant names from the meeting UI and address people directly.
### Supported platforms
| Platform | Status |
| --------------- | --------- |
| Zoom | Supported |
| Google Meet | Supported |
| Microsoft Teams | Supported |
### Try it yourself
| Resource | Link |
| ------------------------------ | ------------------------------------------------------------------------------------------------------------- |
| Runway Characters Meet web app | [runway-characters-meet-production.up.railway.app](https://runway-characters-meet-production.up.railway.app/) |
| API key signup | [dev.runwayml.com](https://dev.runwayml.com) |
| Custom Characters | [Create your own](/characters/create-your-own) |
| Source code | [github.com/runwayml/runway-characters-meet](https://github.com/runwayml/runway-characters-meet) |
If you’d like to build your own app to invite Characters to meetings, check out the README in the [runway-characters-meet](https://github.com/runwayml/runway-characters-meet) repository.
***
### Next steps
[Create your own Character ](/characters/create-your-own)Upload an image, pick a voice, and write a personality to build a custom Character for your meetings.
---
# Embedded Widget
> Add a Runway Character to any website with a single script tag — no server, no API key on the client, no React required.
The embedded widget is the simplest way to put a Runway Character on your website. Drop a single script tag into your HTML and your visitors can start a video conversation — no backend, no React, no API key management on the client.
[Embed a Character on your website](https://www.youtube.com/embed/k-a7wBVYQrw?rel=0)
**Helpful links:**
* [Developer Portal](https://dev.runwayml.com)
## When to use the widget
| | Widget | [React SDK](/characters/integration) |
| ------------------- | ------------------------- | ------------------------------------ |
| **Setup** | One script tag | Server route + React |
| **Server required** | No | Yes |
| **Customization** | Portal config | Full programmatic control |
| **Best for** | Marketing & support pages | Custom apps, integrations |
Use the widget when you want the lowest-effort integration. Use the [React SDK](/characters/integration) when you need full control over the UI and session lifecycle.
Public-facing
The widget runs entirely in the browser — there is no server-side API key involved. The **domain allowlist** is the primary security boundary. Only enable the widget for Characters you intend to be publicly accessible.
## Setup
### 1. Open your Character
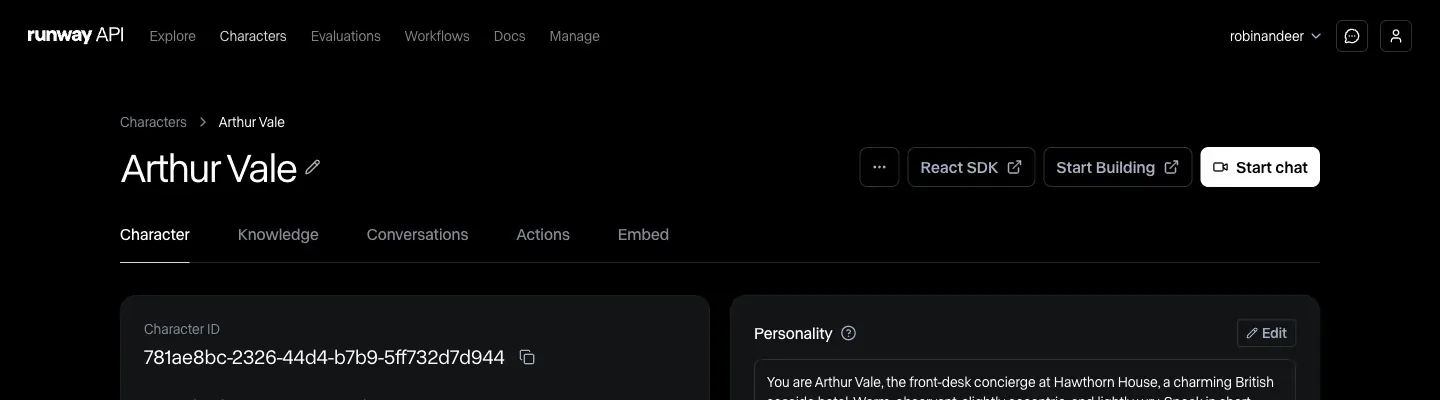
Go to the [Developer Portal](https://dev.runwayml.com/) and click into the Character you want to embed.
### 2. Configure the Embed tab
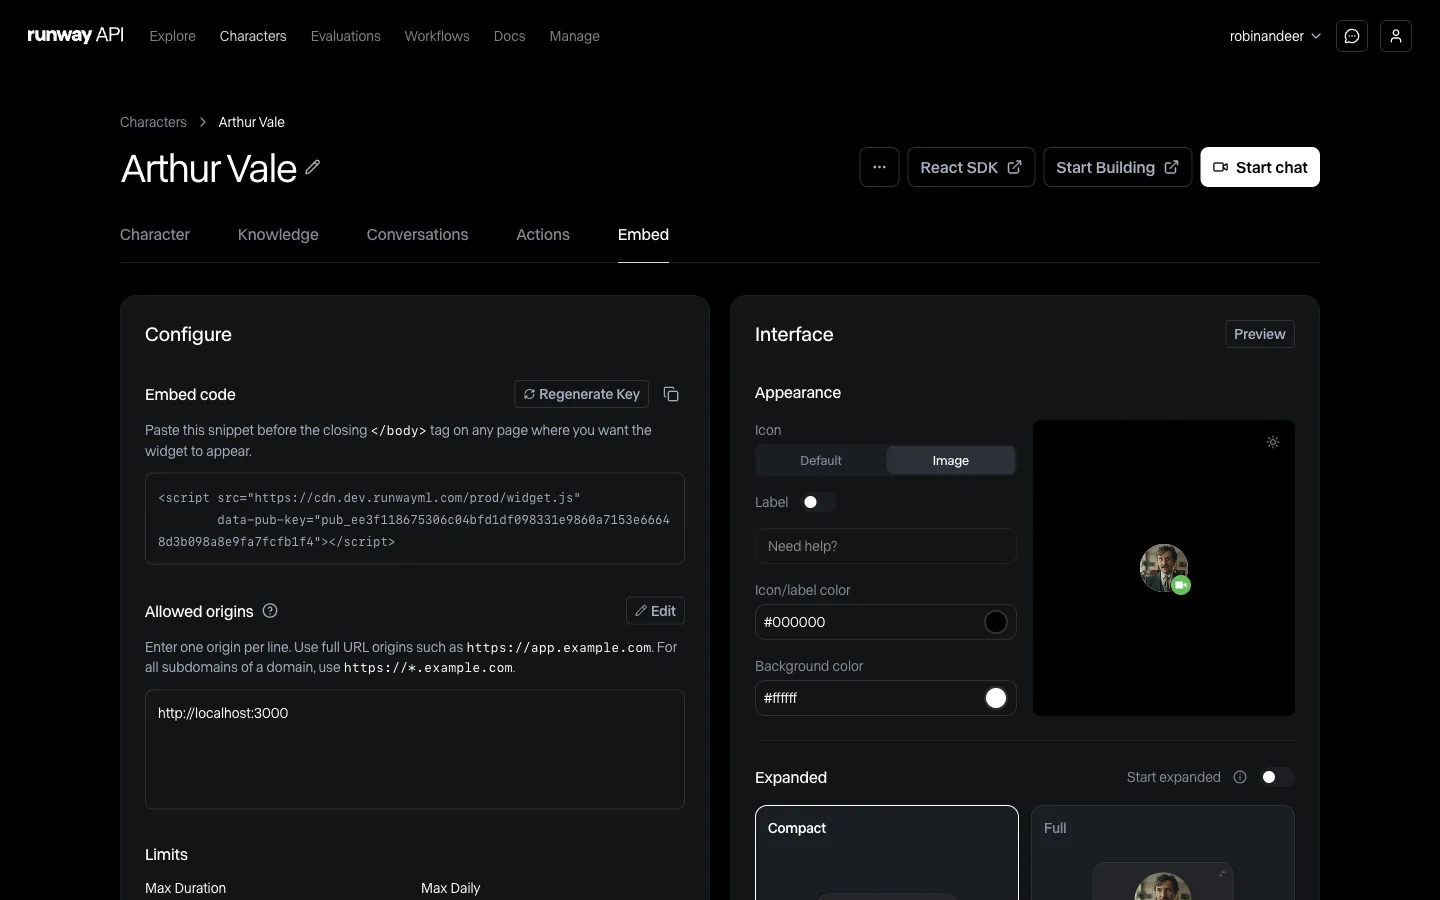
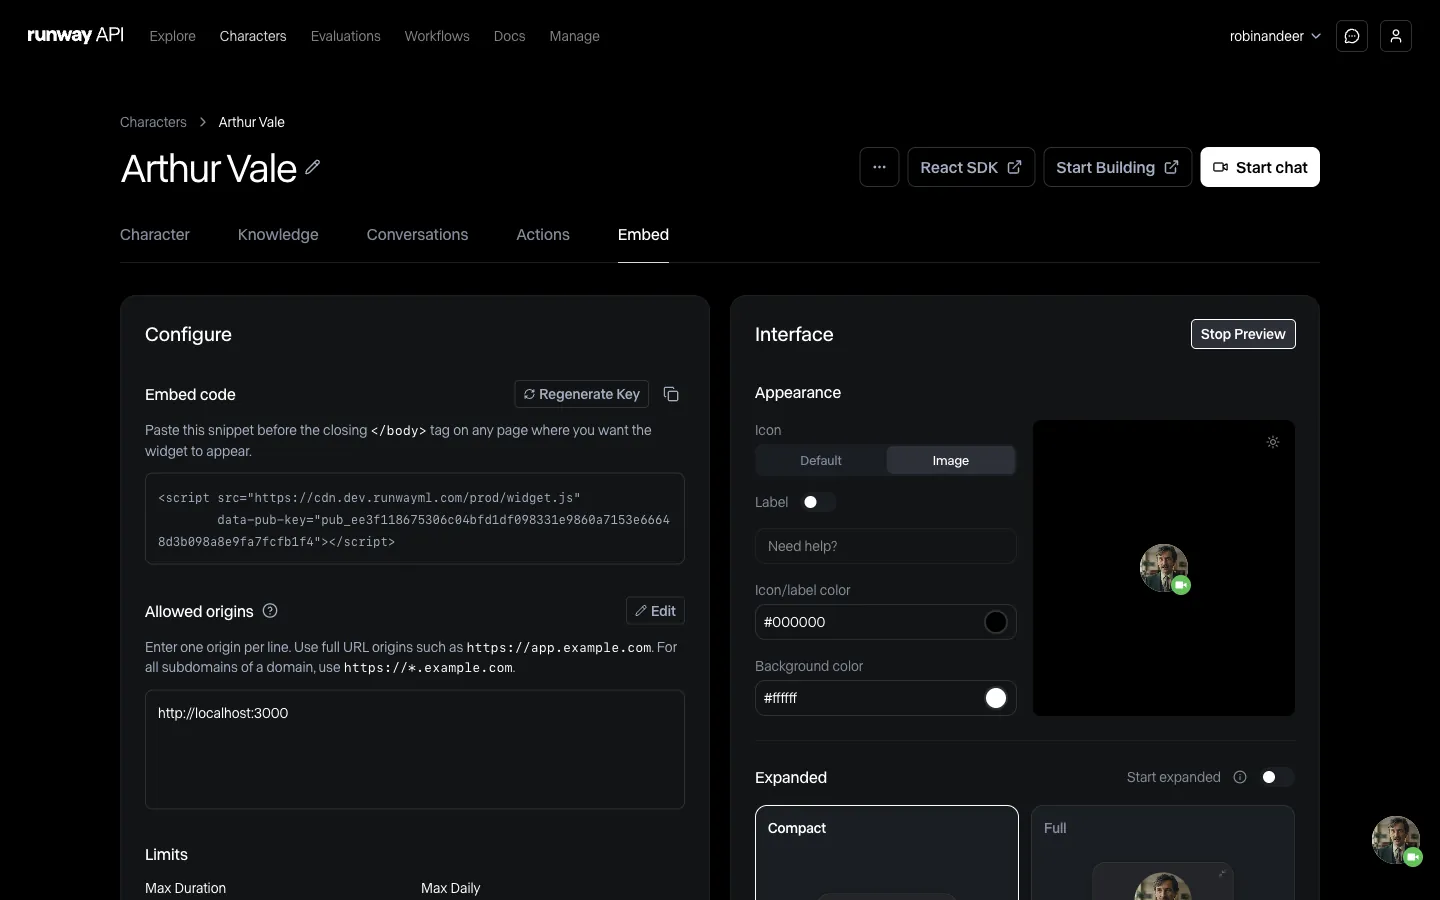
Navigate to the **Embed** tab. Add at least one allowed origin (e.g. `http://localhost:3000` for local development), then adjust limits and styling to suit your site. See [Configuration](#configuration) below for details on each setting.
### 3. Preview and copy the embed code
Use the **Preview** to check your changes, then copy the script tag shown at the top of the page.
### 4. Add the script tag to your site
Paste the snippet into your site’s HTML, before the closing `